
African violets are charming houseplants known for their fuzzy leaves and colorful blooms. One of the best things about them is how easy they are to propagate from a single leaf. Whether you’re a beginner or a seasoned gardener, growing an African violet from a leaf offers a rewarding way to expand your collection. In this guide, you’ll learn everything you need to know—from choosing the right leaf to planting, lighting, watering, fertilizing, and keeping pests away.
Choosing the Right Leaf for Propagation
Start with a healthy, mature African violet leaf. Look for one located midway down the plant—leaves at the base are too old, while newer ones near the center may not be strong enough to produce new growth. The chosen leaf should be vibrant green with no signs of disease or damage. Use a clean, sharp knife or scissors to cut the leaf with at least one inch of stem (petiole) attached.
After cutting, let the leaf sit for about 30 minutes to allow the cut edge to callous slightly. This small step can help prevent rot during propagation, especially if you’re planting directly in soil.
Propagating African Violets in Water
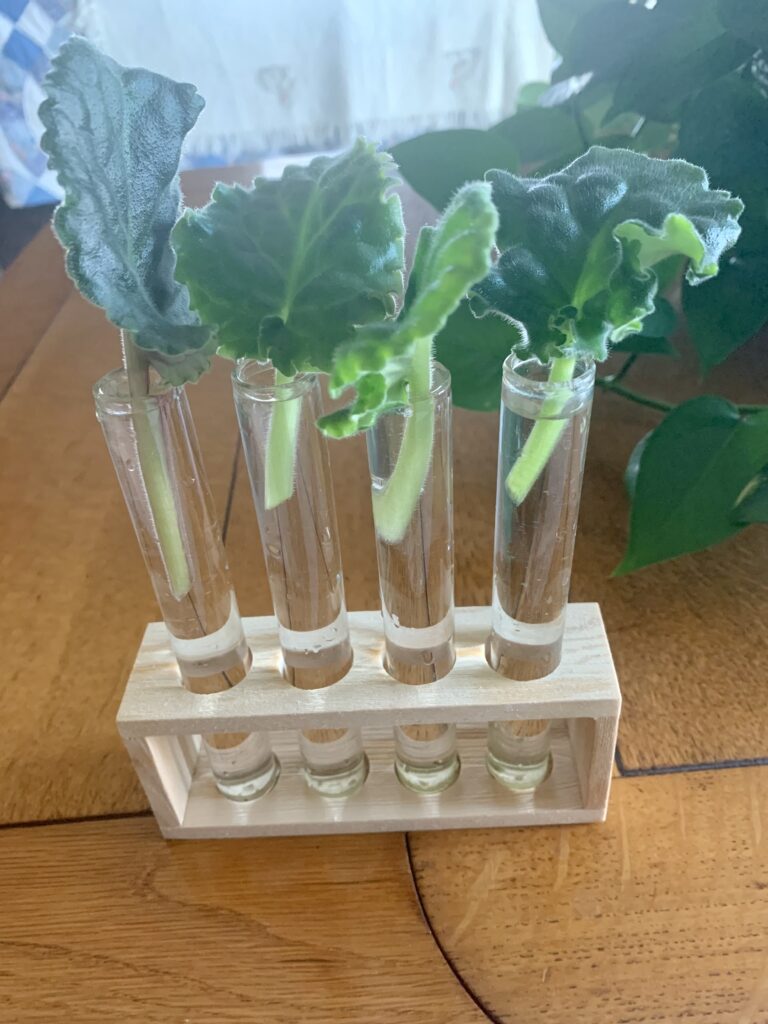
Water propagation is simple and a fun way to watch roots and baby plants form. Begin by placing the leaf stem in a small glass or jar or propagation station filled with water. Make sure only the stem is submerged—not the leaf itself. Use a small propagation station or even a bottle with a narrow opening to keep the leaf upright.
Place the container in a bright area with indirect sunlight. Avoid direct sun, which can scorch the leaf. Change the water every few days to keep it fresh and prevent bacteria from forming. In about 2 to 3 weeks, you should see roots develop. Once the roots are 1-3 inches long, it’s time to move them to soil.
Propagating African Violets in Soil
If you prefer to skip the water step, you can plant the leaf directly into soil. Use a light, airy soil mix—either a commercial African violet mix or a homemade one made of peat moss, perlite, and vermiculite. Moisten the soil before planting. Then, insert the stem at an angle into the soil, just deep enough to keep it steady.
Cover the pot with a clear plastic dome or bag to create a humid environment. This helps speed up root formation. Make sure the plastic doesn’t touch the leaf and remember to ventilate the cover every few days to prevent mold. Place the container in bright, indirect light and keep the soil lightly moist. In a few weeks, you’ll see new growth appear near the base of the leaf.
Potting New African Violet Plantlets
Once the baby plants are about 2 to 3 inches tall and have at least three to four leaves, they are ready to be potted individually. Gently separate the plantlets from the mother leaf. You can do this by loosening the soil and teasing the roots apart. If the roots are tangled, use water to rinse off the soil for easier separation.
Choose a small pot—2 to 3 inches wide is ideal at this stage. African violets like to be slightly root-bound, so don’t move them into a large pot too soon. Fill the pot with a fresh, well-draining African violet soil mix. Place the plantlet in the center and gently firm the soil around the roots. Water lightly after planting.
Choosing the Right Pot for African Violets
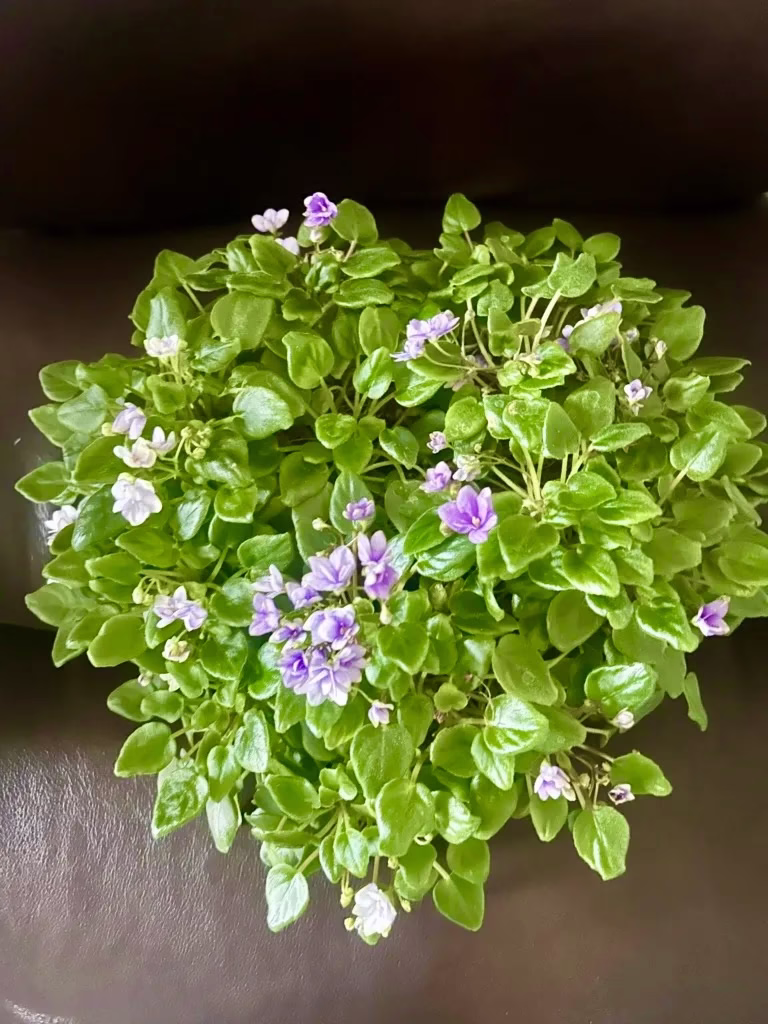
The right pot makes a big difference in how well your African violet grows. Use a plastic, ceramic, or self-watering pot. Terra cotta can dry out too quickly unless you are diligent with watering. Although I have one African Violet in my collection that loves its terra cotta pot-it is a trailer pictured at the beginning of this post. Self-watering pots and water wicking pots are especially useful because they provide consistent moisture without risking overwatering. 90% of my collection are in water wicking pots and the remaining with exception of a few are in Ceramic AV self watering pots.
Make sure the pot has drainage holes to prevent water from pooling at the bottom. African violets hate sitting in soggy soil, which can lead to root rot. If you use a decorative outer pot without drainage, always empty out any excess water after watering.
Watering African Violets Correctly
Watering African violets the right way is key to their health. Bottom watering is a popular method—place the pot in a shallow dish of water and let it soak for about 30 minutes. Then, remove the pot and let any excess water drain out. This helps avoid wetting the leaves, which can cause spots or rot.
You can also use a watering can with a long spout to direct water to the base of the plant. Always use room temperature water and water when the top inch of soil feels dry. Avoid overwatering, but don’t let the soil become bone dry either.
Providing the Right Light for Healthy Growth
African violets thrive in bright, indirect light. Place them near an east or north-facing window, where they’ll get gentle sunlight. If natural light is limited, grow lights work well too. Choose fluorescent or LED lights designed for plants and place them about 12 inches above the leaves. Keep the lights on for about 12 to 14 hours a day.
If your plant gets too little light, it will grow leggy and produce few flowers. On the other hand, too much direct sunlight can scorch the leaves. Rotate your plant every week to help it grow evenly on all sides.
Fertilizing for Lush Leaves and Blooms
Feeding your African violet gives it the nutrients it needs to thrive. Use a balanced African violet fertilizer like my favorite Schultz African Violet Plus, which includes micronutrients to support healthy growth. Apply fertilizer every 2 to 4 weeks during the growing season.
You can also use a liquid fertilizer diluted to half strength if you water frequently. Avoid over-fertilizing, which can lead to salt buildup in the soil and harm your plant. If you see crusty white residue on the soil surface, flush the soil with plain water to wash away excess salts.
Tips for Strong, Healthy Growth
To keep your African violet looking its best, remove any dead leaves or spent flowers as soon as you see them. This encourages new growth and helps prevent disease. Keep the plant in a warm, stable environment with temperatures between 65°F and 75°F. Avoid placing it near drafts or heating vents.
African violets also like a bit of humidity. If your home is dry, place a shallow tray of water with pebbles near the plant or use a humidifier. Don’t mist the leaves, as this can lead to spotting or fungal issues.
Common Pests and How to Handle Them
African violets are fairly resistant to pests, but you should still watch for problems. Common pests include aphids, mealybugs, thrips, and spider mites. Check the undersides of leaves and around the crown for signs like sticky residue, webbing, or small insects.
If you spot pests, isolate the plant immediately. Use insecticidal soap or neem oil to treat the infestation. For stubborn problems, a cotton swab dipped in rubbing alcohol can help remove pests by hand. Keep new plants separate from others for a few weeks to make sure they’re pest-free before introducing them to your collection.
Final Thoughts on Growing African Violets from Leaf
Growing African violets from a single leaf is not only easy but also deeply satisfying. With just a little care, the right soil, gentle lighting, and consistent watering, you can turn one plant into many. Remember to choose a healthy leaf, decide whether to root in water or soil, and give your new plantlets the best start with the right pot and care. With time and patience, you’ll enjoy the vibrant flowers and lush foliage that make African violets a favorite for indoor gardeners everywhere.
By following these simple tips and maintaining a regular care routine, your African violets will thrive—and you’ll enjoy the beauty and joy of nurturing them from the very beginning.
Please be sure to check out my Gardening Blog Post Page for more tips on all types of gardening. Including Seed Saving, Seed Starting, Orchids, Water Gardening, Coldframe Gardening, Indoor Bulb Gardening, Hydroponics, Container Gardening, Mums, Herbs, African Violets, planting Bulbs, Flower Gardening, Vegetable and Fruit Gardening, Indoor Houseplants of all kinds, Bonsai, Cactus, Succulents, Hanging plants, Deer resistant plants and even Bird, Bee, Butterfly and Hummingbird Gardens!