
African violets are one of the most rewarding houseplants to grow, and propagating them in water is a fun and easy way to expand your collection. With their soft, fuzzy leaves and continuous blooms, these plants are a favorite among both beginners and seasoned gardeners. Water propagation is one of the simplest and most visually satisfying methods, especially when you use a clean and stylish propagation station. Let’s walk through how to propagate African violets in water, from selecting the right leaf to placing it in your propagation station and watching roots begin to grow.
Why Choose Water Propagation for African Violets?
Water propagation allows you to see every step of your plant’s root development, which makes it both educational and rewarding. Unlike soil propagation, water propagation gives you full visibility of the roots forming, which also means you can easily spot any problems like rot or fungus. It’s also a cleaner process with fewer supplies needed. Plus, a propagation station adds an attractive, organized look to your plant shelf or windowsill.
What You’ll Need to Get Started
To begin, gather the right supplies. You’ll need a healthy African violet plant, a sharp sterile knife or pair of scissors, a clean glass or small container for water or even a propagation station. These stations come in a variety of styles, often featuring test tubes or small glass jars held in a wooden or metal frame. Choose one that fits your space and style. Make sure your container is narrow enough to hold the leaf upright without letting it touch the water too deeply.
Choosing the Right Leaf for Propagation
Start by selecting a mature but healthy leaf from the middle rows of your African violet. Avoid the very young leaves in the center or the oldest ones near the bottom. The leaf should be firm and unblemished. Using your sterile knife or scissors, cut the leaf off with about 1 to 1.5 inches of stem attached. This stem is called the petiole and will be the part that sits in the water.
Preparing the Leaf for Propagation
After cutting your leaf, trim the petiole to about ¾ to 1 inch at a 45-degree angle. This diagonal cut exposes more surface area to the water and encourages root development. Let the leaf sit for a few minutes to callous over—this helps prevent rot once it’s submerged in water.
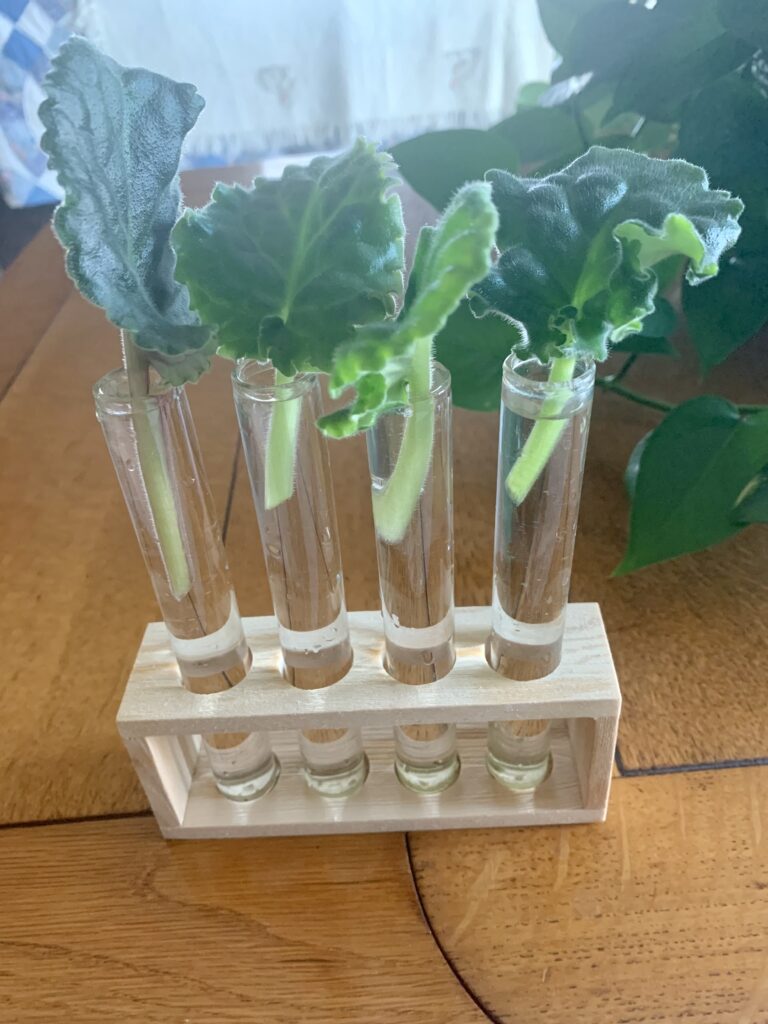
Placing the Leaf in Your Propagation Station
Now it’s time to place the prepared leaf in your propagation station. Fill your glass tube or jar with clean, room-temperature water—preferably filtered or distilled to avoid chlorine and other chemicals. Submerge only the stem of the leaf in water, keeping the leaf blade itself well above the surface. The goal is to encourage root growth without letting the leaf rot.
Propagation stations are perfect for this because they hold the leaf upright and stable. You can use decorative glass test tubes or simple mason jars with a plant buddy to hold your leaf in the jar. Just make sure the container lets in light but also protects the roots from direct sun exposure.
Caring for Your Leaf During Water Propagation
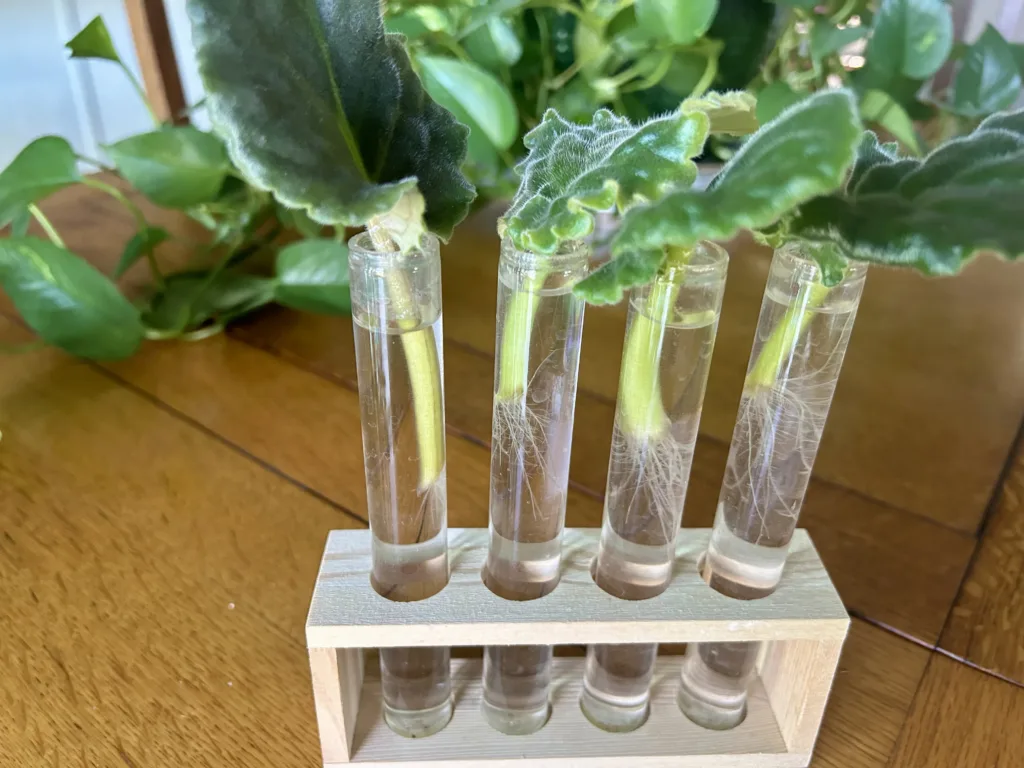
Once your leaf is settled into the propagation station, place it in a bright spot with indirect sunlight. Avoid direct sun, as it can overheat the water and damage the leaf. Change the water every 5 to 7 days to keep it fresh and clear of bacteria. If you notice cloudiness or algae, clean the container and refill it with fresh water.
In a few weeks, usually between 3 to 6 weeks depending on temperature and light, you’ll begin to see tiny white roots forming at the base of the petiole.
Transferring Rooted Leaves to Soil
Once the roots are about 1 to 2 inches long, it’s time to transplant. Prepare a small pot with African violet soil, which should be lightweight and well-draining. A mix of peat moss, perlite, and vermiculite works well. Make a small hole in the center of the soil, and gently plant the roots just below the surface.
Water the soil lightly and place the new plant in the same bright, indirect light it enjoyed during water propagation. Continue to keep the soil slightly moist but never soggy, and within a few weeks, the plantlet will begin growing more vigorously.
For a more in depth post on African Violet Care just click here to go to my African Violet page with all my blog post on starting, growing and caring for African Violets.
Tips for Success When Propagating in Water
To increase your success rate, always start with more than one leaf. Sometimes a leaf may rot or fail to root, and having several increases your chances. Avoid letting any part of the leaf sit too deep in the water, as this causes decay. If you’re using tap water, let it sit out overnight to allow the chlorine to evaporate.
Temperature also plays a big role. African violets prefer warm conditions, so keep your propagation station in a room that stays between 70–75°F.
Choosing the Right Propagation Station
A propagation station does more than just hold your cuttings. It can become part of your home decor while keeping your plants safe and stable. Choose a station that holds several glass tubes so you can propagate multiple leaves at once. Some stations are wall-mounted, while others sit on shelves or countertops. Look for one that’s easy to disassemble for cleaning and allows enough light to reach the roots without overexposing them.
For a sleek look, go with a modern metal or glass station. If you prefer a rustic or boho style, choose wood-framed stations with clear glass vials. Many propagation stations are available Amazon.
Watching the Process Unfold
One of the most rewarding aspects of water propagation is watching the roots grow day by day. Unlike soil propagation, where everything happens out of sight, this method lets you truly connect with the plant’s development. It’s also a great way to teach kids or new gardeners about plant biology and the life cycle of houseplants.
As your African violet cuttings grow, you’ll notice differences in speed and vigor between each one. Some may sprout quickly, while others take their time. Be patient—root growth often starts slowly, then speeds up once root form.
Troubleshooting Common Problems
While propagating African violets in water is simple, a few problems may arise. If your leaf begins to turn mushy or discolored, it’s likely too deep in the water or not trimmed properly. Always remove any failing cuttings right away to prevent the spread of bacteria. Cloudy water is another sign that it’s time for a change and possibly a clean container.
If roots don’t form after several weeks, make sure the leaf is healthy, the room is warm enough, and the water is clean. Occasionally, certain leaves just don’t take, and that’s why starting with several increases your chances of success.
Enjoy Your Growing Collection
Once you’ve successfully propagated one African violet, you’ll likely want to do more. This method is addictive in the best way and gives you a constant supply of new plants to share or enjoy. You can even experiment with propagating leaves from different varieties and labeling your cuttings so you know what colors or leaf shapes to expect.
By using a propagation station and following a few simple steps, anyone can successfully propagate African violets in water. With a little patience and care, your single cutting will transform into a vibrant, blooming houseplant ready to brighten any room.
Please be sure to check out my Gardening Blog Post Page for more tips on all types of gardening. Including Seed Saving, Seed Starting, Orchids, Water Gardening, Coldframe Gardening, Indoor Bulb Gardening, Hydroponics, Container Gardening, Mums, Herbs, African Violets, planting Bulbs, Flower Gardening, Vegetable and Fruit Gardening, Indoor Houseplants of all kinds, Bonsai, Cactus, Succulents, Hanging plants, Deer resistant plants and even Bird, Bee, Butterfly and Hummingbird Gardens!