
Have you ever wondered how to make a moss pole for your houseplants? If you own a climbing plant, then you know how beautiful they are when they reach their full potential. A moss pole is a fantastic way to stimulate growth and make your indoor plants thrive, without taking away from the elegance of your home décor. This post will guide you through the process of creating your very own DIY moss poles. You will learn about the types of moss to use, the necessary materials, and the different structures for your DIY moss poles. With a little bit of creativity and time, you can create a beautiful and eco-friendly addition to your indoor garden.
Types of Moss
There are several types of moss you can use for your DIY moss poles, each with their advantages and disadvantages. Along with plants that work best with each type of moss.
Sphagnum Moss
Sphagnum Moss is a popular choice for moss poles due to its great moisture-retention capabilities. It has the ability to absorb and hold up to 20 times its weight in water, making it a good choice for plants that require high humidity or have a fast growth rate.
However, there are some disadvantages to using Sphagnum Moss. It can be more expensive than other types of moss and it dries out quickly, meaning it requires more frequent watering. It’s also slightly acidic, which might not be suitable for all types of plants.
When it comes to the best plants to pair with a Sphagnum Moss pole, climbing plants that love humidity are your best bet. Plants like Philodendrons, Monstera Deliciosa, and Pothos are excellent choices as they tend to grow upwards and would greatly benefit from the moisture provided by the Sphagnum Moss.
Sheet Moss
Sheet Moss, also known as Hypnum Moss, is another excellent choice for your DIY moss poles. It’s widely praised for its lush, carpet-like appearance and its affordability compared to Sphagnum Moss. Sheet Moss retains moisture effectively, although not quite as much as Sphagnum Moss. This type of moss is also more resilient and less likely to dry out, which means it doesn’t require watering as frequently.
However, on the downside, Sheet Moss has less structure than Sphagnum Moss, which means it may not offer the same level of support for heavier climbing plants. Furthermore, it can sometimes be challenging to attach to the support pole.
Sheet Moss is best suited for plants that don’t rely heavily on their climbing support and don’t require excessive moisture. Some ideal plant companions for a Sheet Moss pole might include the ZZ Plant, English Ivy, and certain varieties of Ferns. These plants enjoy a moderate level of humidity and can thrive with the support and aesthetics a Sheet Moss pole provides.
Spanish Moss
Spanish Moss, scientifically known as Tillandsia usneoides, is a unique choice for your DIY moss pole. It’s an epiphytic bromeliad that grows naturally in the southern United States, Central and South America. Being an air plant, it doesn’t depend on soil but absorbs nutrients and water through its leaves from air and rain, making it an interesting and low-maintenance option for a moss pole.
One significant advantage of using Spanish Moss is its intriguing aesthetic appeal. It has a distinctive, draped look that can add an exotic, tropical touch to your indoor garden. Another advantage is its adaptability. As an air plant, it doesn’t require direct contact with soil to survive, which makes maintaining the moisture level less of a hassle compared to other types of moss.
On the downside, it’s important to note that Spanish Moss does not retain water as efficiently as other mosses, such as Sphagnum Moss and Sheet Moss. Therefore, it may not be the most suitable choice for plants that need high humidity. Also, Spanish Moss has a loose, airy structure that might not provide the firm support that heavier climbing plants need.
Considering these factors, Spanish Moss is a good match for lighter, air-loving plants that don’t require a high level of moisture or strong structural support. Air plants, such as other Tillandsia species, or Hoya plants, are an excellent choice to pair with a Spanish Moss pole. Their needs align well with the features of Spanish Moss, and they can add a stunning visual combination to your indoor plant collection.
Moss Pole Structures
When creating your own DIY moss poles, the structure you choose for your pole plays a crucial role. Different structures offer various benefits and potential drawbacks, so it’s important to pick one that suits your plant’s needs and your personal preferences. Here are a few common structures you might consider for your moss pole:
PVC Pipe
PVC Pipe is a common choice for the structure of a DIY moss pole. This is primarily due to its durability and sturdiness. It can easily support the weight of a large, mature plant without bending or breaking, making it ideal for heavy climbers. Additionally, PVC pipe is waterproof, which means it won’t rot or degrade with the moisture from the moss or watering your plants.
However, a potential downside of PVC pipe is that it’s not the most eco-friendly option. The production and disposal of PVC can lead to the release of harmful chemicals. Moreover, PVC pipe is smooth and it might be challenging for the moss to adhere properly. This might require additional measures like netting or wire to keep the moss securely in place.
Bamboo
Bamboo is another popular option for the structure of a moss pole. Known for its strength and flexibility, bamboo offers an eco-friendly alternative to PVC pipe. It’s naturally rot-resistant and can handle the moisture levels required for the moss and plant. Bamboo also has a rougher texture which can make attaching the moss easier and provides a more natural look to complement your indoor plants.
On the other hand, Bamboo is not as durable as PVC pipe and might not support the weight of heavier plants. It can also splinter over time, which might be a problem if you frequently handle or move your moss pole.
Coir Poles
Coir Poles are made from coconut fibers, making them an eco-friendly and sustainable option for your moss pole. They provide a natural, organic appearance which can complement your plants and home decor. The texture of coir poles is ideal for the moss to adhere and for plant roots to latch onto, promoting good aeration and growth.
The downside to coir poles is that they may not be as sturdy as PVC or bamboo poles. They also absorb a lot of water which can lead to quicker degradation over time. Additionally, they might require more frequent watering due to their high absorption rate.
Remember, the choice of structure for your DIY moss pole heavily depends on the type of plant you’re supporting, the moss you’re using, and your aesthetic preference. It’s always a good idea to research and consider all options before making your decision.
Wire Cage
A Wire Cage is another option for creating the structure of your moss pole. This structure is typically made by wrapping a sturdy wire, such as chicken wire, around a central post, creating a cage-like structure that can be filled with moss.
One of the main advantages of a wire cage is its flexibility; you can form it into various shapes and sizes to suit your needs. Furthermore, the openings in the wire allow for excellent aeration and water drainage, which can promote healthy plant growth and prevent root rot. The wire is also sturdy enough to support heavier climbing plants.
However, the downside of wire cages is their appearance, which some may find less attractive or natural-looking compared to bamboo or coir poles. Additionally, the metal of the wire cage may rust over time, especially with frequent watering and high humidity. Lastly, the process of filling the cage with moss can be more time-consuming and tricky compared to other structures where the moss can be more easily attached to the outside.
Applying Moss to Different Pole Structures
Each pole structure requires a slightly different method of applying the moss. Here are the methods for each:
PVC Pipe
To attach moss to a PVC Pipe, first, wrap the pipe with a layer of sphagnum moss, ensuring all areas are covered. Then, wrap the moss-covered pipe with plastic netting or wire to keep the moss securely in place. Remember to leave some spaces open for plant roots to latch onto the moss.
Bamboo
For a Bamboo pole, you can apply a layer of moss using a strong, natural fiber string or wire. Start by soaking the moss in water and then wrap it around the bamboo pole. After that, secure the moss by wrapping the string around the moss and the pole. Make sure to wrap it tightly enough to hold the moss, but loose enough for the plant roots to penetrate.
Coir Poles
Coir Poles are typically pre-made with coir, but if you’re making your own, start by wrapping a layer of coir around a sturdy pole. Secure the coir to the pole with a strong, natural fiber string or wire, winding it in a spiral direction from top to bottom. This will keep the coir in place and give your plant room to grow.
Wire Cage
Wire Cage poles can be a bit more complex as the moss needs to be inserted inside the cage. Start by cutting a piece of chicken wire that’s long enough to wrap around your central pole with some extra space for the moss. After wrapping the wire around the pole, secure it with wire ties. Then, stuff the moss into the cage, making sure to pack it tightly enough that it will stay put, but loosely enough to allow for water drainage and root penetration.
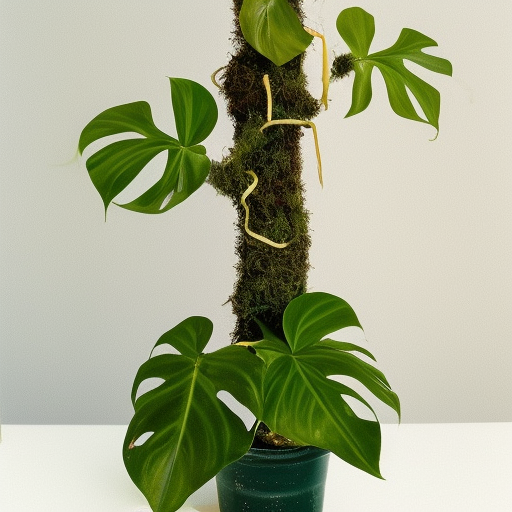
Planting Your Climbing Plant with Your Poles
After you’ve prepared your moss pole, it’s time to plant your climbing plant. Regardless of the pole type you’ve chosen, the process remains fairly similar.
Start by filling a pot large enough to support your plant’s growth with a good-quality potting mix. Dig a hole in the center of the pot, insert the base of your moss pole, and then fill the pot with more soil to secure the pole.
Next, take your climbing plant. Loosen the root ball gently with your fingers, making sure not to damage the roots. Plant it next to the moss pole, ensuring the roots are fully submerged in the soil.
After planting, it’s time to attach your plant to the pole. You can do this by gently guiding the plant’s stems towards the pole. For plants with tendrils, you can wrap the tendrils around the pole loosely. For plants without tendrils, you may need to use a soft tie or twine to gently secure the plant to the pole. Avoid tying the plant too tightly as this can damage the stems.
Finally, water your plant thoroughly, making sure the water reaches the root zone. You’ll also want to moisten the moss pole. This keeps the environment humid and encourages the roots to grow towards the pole. Remember to keep the pole moist as you care for your plant. It’s also important to rotate your plant regularly for even growth.
Watering Your Moss Pole
Watering your new DIY moss poles correctly is essential for the health of your climbing plant. Start by gently pouring water from the top of the pole, ensuring the water seeps into all the layers of the moss. Use a spray bottle or a watering can with a gentle shower head to avoid displacing the moss.
It’s important to keep the moss pole consistently moist but not soaking wet. Overwatering can lead to root rot and other water-related diseases. So, make sure your moss pole is damp to the touch but not dripping with excess water.
Watering frequency will depend on your specific indoor environment. As a general rule, you should water the moss pole every time you water the plant. However, if the air in your home is particularly dry, you might need to water the moss pole more frequently. The key is to pay attention to the moisture level of the moss and adjust your watering schedule as necessary.
Remember, a well-watered moss pole creates a humid microclimate around your plant, encouraging its aerial roots to grip onto the pole and promoting healthy growth. So, always keep an eye on the moisture level of your moss pole and water as needed.
Troubleshooting Plant Issues with DIY Moss Poles
Despite our best efforts, sometimes plants encounter issues when using moss poles. Here are some common problems and their solutions:
1. Plant not attaching to the pole
If your plant isn’t attaching to the moss pole, it could be due to dry moss. Plants attach their aerial roots to a moss pole because of the moisture it holds. Ensure your moss pole is consistently moist and not just wet on the surface.
2. Mold on the moss pole
Mold on your moss pole may indicate overwatering or poor air circulation. Reduce the watering frequency and ensure the pole is in a well-ventilated area. If the mold persists, you may need to replace the pole and ensure your plant is not overwatered.
3. Plant growth is sluggish or stunted
Lack of growth could be due to insufficient nutrients in the soil. Moss poles do not provide any nutrients to the plant, so you will need to add a balanced fertilizer to your watering routine to ensure your climbing plant gets the nourishment it needs.
4. Yellow or browning leaves
This could be a sign of overwatering, under-watering, or lack of nutrients. Check the moisture level in the pot – the soil should be damp, not soggy or dry. If watering isn’t an issue, your plant may need more nutrients.
5. Moss pole drying out too quickly
If your moss pole is drying out too quickly, it may be due to low humidity or the pole being located near a heat source like a heater or a sunny window. Move the pole away from the heat source, mist it regularly, or consider using a humidifier to maintain the needed humidity levels.
Here’s a key tip to always remember: monitor your plant closely. Each plant can react differently to the environment, and understanding its individual needs is necessary for successful growth with moss poles.
Happy Gardening!
In conclusion, creating a DIY moss poles is an excellent way to support your climbing plants while turning them into a beautiful indoor decoration. With a little bit of guidance and creativity, it’s easy to make your own moss poles for your home. Remember to use the right type of moss, select the right pole structure, gather the necessary materials, apply the moss, and finally, plant your climbing plant. You’ll have a stunning and eco-friendly addition to your home décor in no time.
Please be sure to check out my Gardening Blog Post page for more growing tips on Hydroponic Gardening, Container Gardening, Mums, Herbs, African Violets, bulbs and how to plant them, Flower Gardening, Vegetable and Fruit Gardening, Indoor Houseplants of all kinds, Cactus, Succulents, Hanging plants, Deer resistant plants and even Bird, Bee, Butterfly and Hummingbird Gardens!