
Starting your seeds can be a rewarding experience. Granting you a head start on the growing season and a greater variety of plant options. For beginners, it’s crucial to begin with good quality seeds and proper seed starting mix, which is lighter and more sterile than regular potting soil. Ensure you have containers with good drainage and consider the timing. Most seeds should be started about 6-8 weeks before the last expected frost in your area. In this blog post we will go over seed starting tips for beginners, from supplies needed to planting them outdoors.
List of Essential Supplies
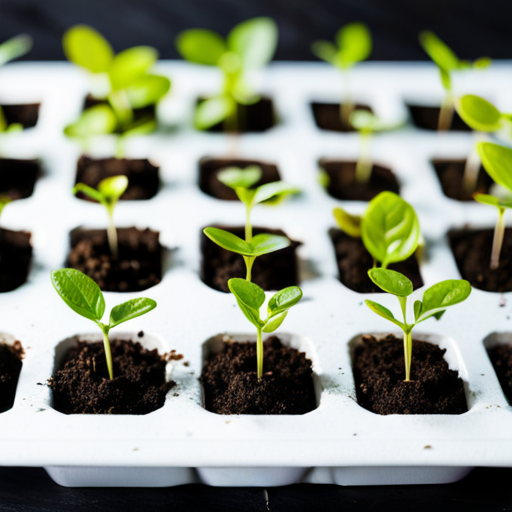
1. Seed Trays or Containers
Choose seed trays or small containers to hold the potting mix and seeds. These can be plastic, biodegradable, or repurposed items like egg cartons, take out containers and yogurt cups.
2. Seed Starting Mix
This is not soil. It’s a very light material, usually a blend of peat moss, vermiculite, and perlite, which provides a gentle environment for young roots. You can also buy a seed starting mix either online or at your local garden center.
3. Plant Labels
Keep your plants’ identities clear by labeling your trays. This saves you from the disorienting ballet of seed mix-ups.
4. Dome or Cover
A clear dome, baggie or plastic wrap helps retain moisture and create a greenhouse effect for your seedlings.
5. Light Source
A sunny windowsill is a start, but a dedicated grow light makes for sturdier plants.
6. Heat Mat
This heat mat is not essential but often gives seeds a head start by providing consistent bottom warmth, which many seeds benefit from.
Step-by-Step Guide
Now that you have gathered your supplies. Here’s your step-by-step guide to successful seed starting:
1. Choose the Right Seeds
Selecting the right seeds is vital for your gardening success. Opt for high-quality seeds from a reliable source to ensure good germination rates. Pay attention to the seed packets for information about plant hardiness, growth requirements, and ideal planting times. Consider the space available in your garden and the climate in your area to determine which plants will thrive. It’s also fun to choose varieties that are not commonly found in stores to make your garden truly unique.
2. Prepare the Seed Starting Mix
Moisten the seed starting mix with water until it feels like a well-wrung sponge—damp but not dripping. This creates the perfect moist environment to encourage seed germination without risking waterlogging and seed rot. Use a large bowl or a tub to easily mix and moisten the medium. Once the consistency is right, fill your trays or containers about three-quarters full with the mix. Avoid compacting the soil to ensure it remains light and aerated, which helps the roots to grow more effectively. After filling, gently tap the containers on the table to settle the mix and eliminate air pockets.
4. Plant the Seeds
Carefully plant your seeds at the depth recommended on the seed packet, which typically ranges from just on the surface to a few millimeters deep. Use a pencil or a small stick to create the hole, or simply sprinkle the seeds on top for those that need light to germinate. To accommodate for seeds that might not germinate, plant two or three seeds per container. You can thin out any extra seedlings later on. Once the seeds are placed, gently cover them with the starting mix, if required. Finally, water the newly planted seeds with a fine mist to settle the mix around the seeds without disturbing them.
5. Provide the Right Environment for Growing
After planting, it’s essential to maintain a stable environment to nurture seedling growth. Position your containers in a spot with consistent, gentle warmth – a heat mat can assist with this, especially for warmth-loving species. Seedlings also require ample light; if natural light is insufficient, supplement with a grow light placed a few inches above the seedlings. Keep the light on for 14-16 hours a day to mimic natural sunlight. Humidity is another factor; maintaining a humid atmosphere by covering the seeds with a dome or plastic can accelerate germination. Remember to remove the covering once sprouts appear to prevent mold growth. Ventilation should not be overlooked; a light fan can circulate air and strengthen seedling stems, preparing them for the outdoors.
6. Monitor and Care for the Seedlings
Regularly check your seedlings for moisture levels, ensuring the seed mix is consistently moist but not waterlogged. Adequate lighting is also crucial; rotate your containers if you notice seedlings reaching for light to promote upright growth. Begin fertilizing with a half-strength liquid fertilizer once true leaves develop, which are the second set of leaves that appear after the initial, less distinct seed leaves.
7. Thinning Out Seedlings
As your seedlings grow, it may become necessary to thin them out. This process involves removing the weaker seedlings to provide the stronger ones more space to grow. To thin out, gently pluck out the smallest or weakest looking seedlings at the soil line, or use a small pair of scissors to cut them, being careful not to disturb the roots of the remaining plants. This sacrifice ensures better airflow and resources for the survivors, leading to healthier plants ready for transplanting.
8. Harden off and transplant the Seedlings into the Garden
Before transplanting your seedlings outdoors, they need to transition from the protected indoor environment to the harsher outside world—a process known as “hardening off”. Start by placing your seedlings outside in a shaded, protected spot for a few hours each day, gradually increasing their exposure to sun and wind over the course of a week or two. This crucial step reduces transplant shock and prepares your plants for a successful transition to the garden. Remember to keep a close eye on the weather and bring seedlings indoors if frost is predicted or if strong winds persist.
Tips for Success
Here are a few tips to ensure your seeds achieve their potential:
Additional Tips and Tricks
- Use tweezers to handle small seeds for precision planting.
- For even moisture, cover the containers with a perforated plastic wrap until the seeds germinate.
Common Mistakes to Avoid
- Overwatering can lead to mold and rot, so resist the urge to douse your seeds daily.
- Forgetting to label. The beauty of gardening is its surprises, but not when you’re expecting tomatoes and get squash instead.
Happy Gardening!
In conclusion, seed starting indoors is a rewarding endeavor that sets the stage for a fruitful gardening season. By choosing the right seeds, preparing the perfect soil blend, providing the ideal environment, and monitoring with care, you give life to a world of plants right at your fingertips. Remember, the patience and attention early on will blossom into thriving plants that bring beauty and bounty to your garden. With these steps, tips, and tricks in your gardening toolkit, you are well-equipped to embark on the journey from seed to sprout to harvest.
Please be sure to check out my Gardening Blog Post Page for more tips on all types of gardening. Including Seed Starting, Orchids, Water Gardening, Coldframe Gardening, Indoor Bulb Gardening, Hydroponics, Container Gardening, Mums, Herbs, African Violets, planting Bulbs, Flower Gardening, Vegetable and Fruit Gardening, Indoor Houseplants of all kinds, Cactus, Succulents, Hanging plants, Deer resistant plants and even Bird, Bee, Butterfly and Hummingbird Gardens!